

In this tutorial we’re going to learn how to create a cool contact manager using html css and javascript
🔗Prerequisites


🔗Get started ✌
The contact manager we’ll build in this tutorial will be pretty cool. a user can add or remove a contact by entering enter after filling details and delete contact by clicking delete icon
I’ll explain how to build each feature, but you must follow along by typing the code and running it on your end to get the most out of this tutoria
🔗First let’s create the skeleton of the ui
Add font awesome cdn 👇
We’ll use font awesome icons in this project for that we have to include font awesome cdn in body tag you can create your own font awesome kit
js<scriptsrc="https://kit.fontawesome.com/dd8c49730d.js"crossorigin="anonymous"></script>
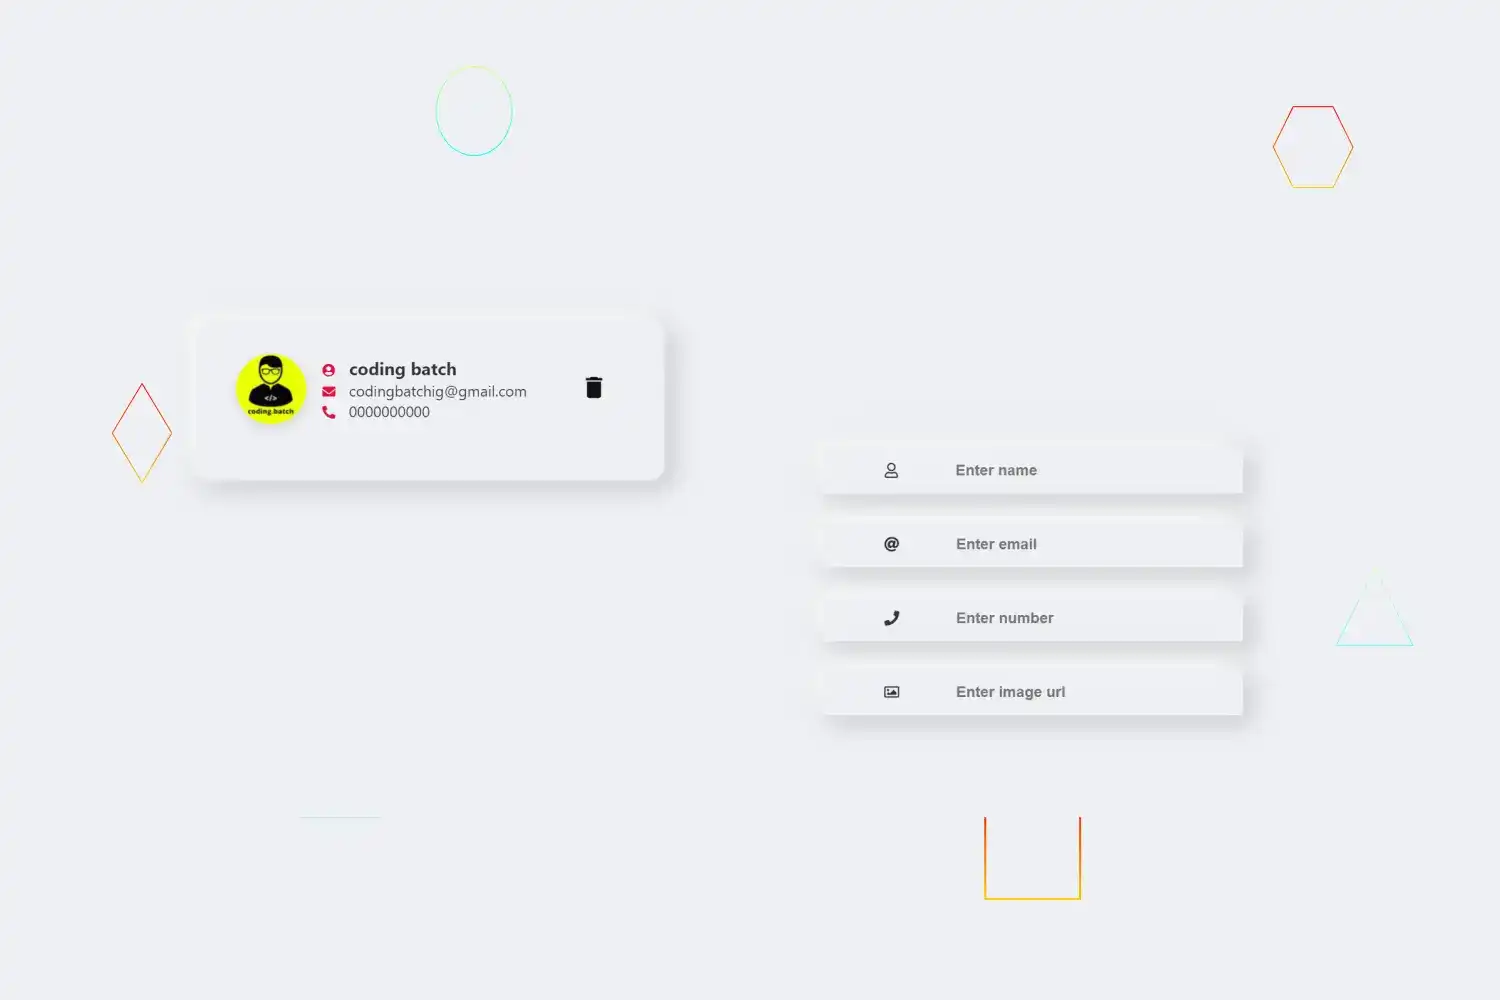
Markup of contact list and contact 👇
html<section class="ListContainer column"><!-- here we'll render contacts --><div id="people" class="Contact_list"></div><!-- mark of contact --><article class="person"><img src="https://avatars.githubusercontent.com/u/84091733?s=280&v=4" /><div class="contactdetail"><h1><i class="fas fa-user-circle contactIcon"></i> coding batch</h1><p><i class="fas fa-envelope contactIcon"></i> codingbatchig@gmail.com</p><p><i class="fas fa-phone-alt contactIcon"></i> 0000000000</p></div><!-- delete contact button --><button class="delete-contact js-delete-contact"><svgfill="var(--svgcolor)"xmlns="http://www.w3.org/2000/svg"width="24"height="24"viewBox="0 0 24 24"><pathd="M6 19c0 1.1.9 2 2 2h8c1.1 0 2-.9 2-2V7H6v12zM19 4h-3.5l-1-1h-5l-1 1H5v2h14V4z"/></svg></button></article><!-- mark of contact --></section>
Markup of add new contact form 👇
html<form autocomplete="off" class="js-form column"><div class="name"><i class="far fa-user"></i><input type="text" id="fullName" placeholder="Enter name" /></div><div class="email"><i class="fas fa-at"></i><input type="email" id="myEmail" placeholder="Enter email" /></div><div class="number"><i class="fas fa-phone"></i><input type="tel" id="myTel" placeholder="Enter number" /></div><div class="img"><i class="far fa-image"></i><input type="url" id="imgurl" placeholder="Enter image url" /></div><button type="submit" class="submitbtn">Add Contact</button></form>
Output of above codes 👉


🔗Let’s add styling into ui 🎨
Creating css variables for colors, typography, visuals etc .
css:root {--bg-color: #eef0f4;--color: #333;--togglebg: #333;--contactIconColor: crimson;--inputTextColor: #111;--deleteIconColor: #111;--filter: drop-shadow(-8px -8px 12px #ffffff) drop-shadow(8px 8px 12px #c3c5c8);--roundcolor: #eef0f4;--toggleslider: #111;--togglesliderColor: #111;}
Basic styling
csshtml {box-sizing: border-box;}*,*::before,*::after {box-sizing: inherit;margin: 0;padding: 0;}body {font-family: -apple-system, BlinkMacSystemFont, "Segoe UI", Roboto,Oxygen-Sans, Ubuntu, Cantarell, "Helvetica Neue", sans-serif;line-height: 1.4;background: var(--bg-color);}
Adding styling into .container and contact .ListContainer referencing –color, --bg-color, --filter1 css variable
css.container {margin: 0 auto;padding-left: 10px;padding-right: 10px;color: var(--color);margin-top: 5vh;margin-bottom: 5vh;display: flex;flex-direction: row;}.ListContainer {width: 50%;margin: 56px 30px 0 51px;max-width: 500px;border-radius: 0.25rem;padding: 1.5rem 2rem;border-radius: 16px;background: var(--bg-color);border: 12px solid var(--bg-color);filter: var(--filter);}


Adding styling into contact and contactIcon referencing –contactIconcolor, --deleteIconColor css variables
css.person {display: flex;column-gap: 0.75rem;margin-bottom: 1.5rem;align-items: center;}.person img {width: 75px;height: 75px;object-fit: cover;border-radius: 50%;box-shadow: 0 5px 15px rgba(0, 0, 0, 0.1);}.contactdetail {margin-right: 5rem;}.contactIcon {margin: 0 10px 0 5px;font-size: 14px;color: var(--contactIconColor);}.person h4 {margin-bottom: 0.35rem;}.person p {margin-bottom: 0;}.delete-contact {border: none;background-color: transparent;outline: none;cursor: pointer;float: right;display: block;position: absolute;right: 10%;}.delete-contact svg {width: 30px;height: 30px;pointer-events: none;fill: var(--deleteIconColor);}


Adding styling into contact form referencing –bgcolor, --filter, --inputTextColor css variables
cssform {width: 50%;left: 50%;margin-top: 15%;margin-left: 7%;position: fixed;}.name,.number,.email,.img {display: flex;justify-content: space-evenly;margin-right: 30%;align-items: center;margin-bottom: 30px;background: var(--bg-color);border: 5px solid var(--bg-color);filter: var(--filter);}input[type="text"],input[type="email"],input[type="url"],input[type="tel"] {width: 240px;background: transparent;border: none;font-family: "Roboto", sans-serif;font-size: 16px;font-weight: 200px;padding: 10px 0;transition: border 0.5s;outline: none;color: var(--inputTextColor);font-weight: bold;}.submitbtn {display: none;}


Styling done 🎨
See the complete code at the end of this step
🔗Let’s start building feature for create new contact and render contact in the list , store contacts as a array object to localstorage
Function for adding new contact
jsfunction addContact(name, email, imageurl, contactnumber, id) {// creating object for storing Contact details name email etc ..const contactObject = {name: document.getElementById("fullName").value,email: document.getElementById("myEmail").value,imageurl: document.getElementById("imgurl").value,contactnumber: document.getElementById("myTel").value,// we'll use this id to delete contact later in this tutorialid: Date.now(),};console.log(contactObject);}
In above code we create a function for adding a new contact
- We created contactObject to store all contact detail as an object property
- In contactObject we getting a value of entered input values with their id by
- using .value method & creating a id in contactObject using date.now method
- Console logged for demo purpose
Add a event listener submit to the form
jsconst form = document.querySelector(".js-form");form.addEventListener("submit", (event) => {event.preventDefault();addContact();form.reset();});
In above code we added a event listener Submit to the form when form is submitted
- We will call our addContact() function for adding contact
- We using reset() method to reset form after submitting a contact See the output in console log 👇
As you can see above after submitting a form by pressing enter we getting a new contact as an object in the console log
But we want to render a contact in contactList to display in page to achieve this we have to create a renderContact() function above addContact() function
Function for rendering new contact in display
In this function we’re going to pass contact as a parameter to access contact details from contactObject eg: contact.name , contact.email etc ..
- We’re going to select list where we will appending a all new contact items
- Select the current contact item in the DOM
- Creating new element article (we’re going to use markup of contact what we created at beginning for demo purpose ) and append node in list
jsfunction renderContact(contact) {}
Select contact list for appending all contacts in list
jsfunction renderContact(contact) {const list = document.querySelector(".Contact_list");}
Select the current contact item in the DOM ( We’ll use item for deleting contact from contact list later in this tutorial )
jsfunction renderContact(contact) {const list = document.querySelector(".Contact_list");const item = document.querySelector(`[data-key='${contact.id}']`);}
Create new element article for contact ui
- Set the class and data-key attribute
- Add html markup of contact
jsfunction renderContact(contact) {const list = document.querySelector(".Contact_list");const item = document.querySelector(`[data-key='${contact.id}']`);const node = document.createElement("article");node.setAttribute("class", "person");node.setAttribute("data-key", contact.id);}
We have to just cut and copy markup of contact ui to set the node.innerHTML what we create at beginning for demo purpose
jsfunction renderContact(contact) {const list = document.querySelector(".Contact_list");const item = document.querySelector(`[data-key='${contact.id}']`);const node = document.createElement("article");node.setAttribute("class", "person");node.setAttribute("data-key", contact.id);node.innerHTML = `<img src="${contact.imageurl}"><div class="contactdetail"><h1><i class="fas fa-user-circle contactIcon"></i> ${contact.name}</h1><p> <i class="fas fa-envelope contactIcon"></i> ${contact.email}</p><p><i class="fas fa-phone-alt contactIcon"></i> ${contact.contactnumber} </p></div><button class="delete-contact js-delete-contact"><svg fill="var(--svgcolor)" xmlns="http://www.w3.org/2000/svg" width="24" height="24" viewBox="0 0 24 24"><path d="M6 19c0 1.1.9 2 2 2h8c1.1 0 2-.9 2-2V7H6v12zM19 4h-3.5l-1-1h-5l-1 1H5v2h14V4z" /></svg></button>`;// appending a node in listlist.append(node);}
Yes here we successfully created our function for rendering a new contact in contact list But as you can see we passed contact as a parameter of function to access the property of contactObject for displaying in contact ui To archive that we have to call rendeContact() function in addContact function and pass contactObject object as an argument in renderContact function
Updated addContact as follows
jsfunction addContact(name, email, imageurl, contactnumber, id) {// creating object for storing Contact details name email etc ..const contactObject = {name: document.getElementById("fullName").value,email: document.getElementById("myEmail").value,imageurl: document.getElementById("imgurl").value,contactnumber: document.getElementById("myTel").value,// we'll use this id to delete contact later in this tutorialid: Date.now(),};renderContact(contactObject);}
In above code we called renderContact function and passed contactObject as an argument now we can use property of contactObject in renderContact() function
Now we can remove a default contact from list what we created at beginning for demo purpose update markup of contact list as follows
html<section class="ListContainer column"><div id="people" class="Contact_list"></div><!-- mark of default contact removed --><!-- mark of default contact removed --></section>
As you can see above it’s work as expected
But here we have one problem when we refresh the page all contacts cleared
See below
To keep it display we have to store data in localstorage for that we can use javascript localStorage object
Save contacts data in browser local storage
- Create empty contacts array for storing all contacts as a array object in localstorage
- To store contacts in localstorage we have to set contacts to localstorage
- Push new contactObject to contacts after calling addContact()
- Get contacts from localstorage to display contacts in contacts list
Creating empty contacts array object
jslet contacts = [];
Set contacts to localstorage
We can set item to localstorage using localStorage.setItem method in renderContact() Add below code line in above renderContact function
js// set item to localStorage to store datalocalStorage.setItem("contacts", JSON.stringify(contacts));
Push new contactObject to contacts array object
We have to push every new contactObject to contacts array object after adding contact Add below code line within addContact
jscontacts.push(contactObject);
Get contacts from localstorage to display contacts in contacts list
To display contacts in contacts list we have to get the contact from contacts array after refreshing page to archive that we have to add event listener DOMContentLoaded and get the contacts from localStorage
js// adding a add event listener when content is loaded and showing stored data array on the screendocument.addEventListener("DOMContentLoaded", () => {const ref = localStorage.getItem("contacts");if (ref) {contacts = JSON.parse(ref);contacts.forEach((contact) => {renderContact(contact);});}});
Now if we refresh page it’s keep the contacts in contact list
See below
See the complete code at the end of this step
Let’s build functionality for deleting contact
Do you remember we created id property in contactObject and set data-key attribute to item in renderContact function now we’re going to use these property and item to delete contact from contact list
Function for delete contact ( in deleteContact function we’re going to )
- find the corresponding contactObject in the contacts array object
- Create a new object with properties of the current contactobject item and a
deletedproperty which is set to true - Remove the contactobject item from the array
- Render UpdatedContactObject
jsfunction deleteContact(key) {const index = contacts.findIndex((item) => item.id === Number(key));const UpdatedContactObject = {deleted: true,...contacts[index],};contacts = contacts.filter((item) => item.id !== Number(key));renderContact(UpdatedContactObject);}
In above code we created function deleteContact with key parameter , to delete specific contact from contacts list we have to know which contact we wanted to delete for that we find the index of corresponding contactObject in the contacts array object using findIndex method when then when deleteContact() called remove the contactobject item from the array by filtering it out otherwise it will not delete contact item by click on delete button from localstorage
Call deleteContact function
jsconst list = document.querySelector(".Contact_list");// adding click event listner in list elementlist.addEventListener("click", (event) => {// if event.target classlist have js-delete-contactif (event.target.classList.contains("js-delete-contact")) {// then get the data key of their parentElement which is article for our project by using dataset.key methodconst itemKey = event.target.parentElement.dataset.key;// then call our deletectContact function by passing itemKey as a argumentdeleteContact(itemKey);}});
In above code we added click event listener to contact list if targeted event class list contains js-delete-contact then get the dataset.key of their parent Element and assign to itemkey and call deleteCount() function and passed itemKey as an argument
Finally let’s add remove method if UpdatedContactObject delete property true
Add below code in renderContact function
jsif (contact.deleted) {// remove the item from the DOMitem.remove();return;}
Now as you can see below we’re able to delete contact from contact list
Congratulation we have successfully created contact manager app 🥳

